Monitoring applications made easy with FloodRunner
An open-source framework for monitoring web applications using browser testing.

The standard that is expected of software systems has skyrocketed in recent years. Not only does your application have to be highly available and reliable, it also needs to: be aware of user location to serve different content; render and function correctly offline AND be highly responsive. These are all things that users expect as the bare minimum to even consider using your site/service. Exhausting, right?
We know that it’s important to constantly monitor our applications to give our users the best experience and make sure we resolve issues before they see them.
However, with today’s ever popular micro services architecture patterns, testing the real experience of users is challenging because we have to simulate the user across an entire distributed system. It’s possible to achieve a high-level of confidence by writing unit and integration tests for these distributed systems but to truly simulate the user’s experience, browser tests are crucial.
In this article, I’ll describe the role of end-to-end browser tests and how FloodRunner can help continuously monitor your systems.
Automated browser testing
There are a number of popular frameworks for browser tests. Some popular open-source ones are:
- Puppeteer — Developed by Google with the purpose of automating and simplifying front-end tests and development. It is based on chromium (also supports Firefox) and can be 100% remotely controlled, allowing web developers to write and maintain simple, fully automated tests.
- Selenium WebDriver — One of the most popular frameworks for creating browser tests, which is available in a number of different programming languages.
- Flood Element — Developed by Flood to make browser based load testing as simple as functional testing. Built on Puppeteer, it has access to all the same functionality and can also be used for load testing on the Flood load testing platform.
Since these frameworks have programmatic access to the browser they can be used for a wide variety of testing scenarios, some of which include:
- 👣 Critical user path testing: Simulate the most business critical flows within your application and ensure that users can always perform those. Its key to figure out what those flows are so you can be selective in writing your tests to focus on the most important aspects of your system. These could include scenarios like logging into your application, browsing an online store and checking out, being able to submit application forms, etc.
- 🌎 Globalization: It’s possible to control the location settings when simulating a user and in this way you can ensure that your site displays the correct content based on the users location.
- 🚀 Performance monitoring: Measure and monitor website performance by capturing key performance indicators such as time taken for DOM load, first meaningful pain and full page loading time. This can be highly beneficial to detect service degradation or see the effects of front-end optimizations that were made during development.
- 💻 Network request mocking: Mock network requests to external services in order to focus on your application’s logic or simulate failed network requests within your system and see how your user interfaces handles the disruption.
Focus on creating tests that are critical to your application.
Basically, there’s an endless number of scenarios you can test and the mentioned frameworks are great for creating those tests. Does that mean you should test everything? No, definitely not. An obvious disadvantage of browser tests are that they are more resource intensive then API or unit tests, and so while they are extremely powerful you should focus on the most critical scenarios for your application.
So let’s see what a potential browser test looks like and walk-through some basic syntax.
Shopping cart browser test
We’ll be creating a basic shopping cart user flow using Puppeteer, this is what the test will look like when we run it:

So let’s walk through the Puppeteer test script for this test:
/**
 * @name Amazon shopping cart flow
 *
 * @desc Searches for a "nyan cat pullover" on amazon.com and then adds it to user's cart
 */
const puppeteer = require('puppeteer')

try {
  (async () => {
    // # 1
    const browser = await puppeteer.launch({
      headless: false, //show browser for debugging purposes
      slowMo: 100, //slowdown interactions by 100 ms
      args: [
        '--window-size=1920,1080',
      ],
    })
    const page = await browser.newPage()

    await page._client.send('Emulation.clearDeviceMetricsOverride');

    await page.goto('https://www.amazon.com') //  # 2

    await page.type('#twotabsearchtextbox', 'nyan cat pullover') // # 3
    await page.click('input.nav-input')

    await page.waitForSelector('.s-result-list') // # 4

    await page.screenshot({
      path: 'amazon_nyan_cat_pullovers_list.png' //  # 5
    });

    const pullovers = await page.$$('a.a-link-normal.a-text-normal') // # 6
    const navigationPromise = page.waitForNavigation()
    await pullovers[1].click();
    await navigationPromise

    await page.select('#native_dropdown_selected_size_name', '0,B07H7GTHZN') // # 7

    await page.waitFor(1000) //  # 8

    await page.click('#add-to-cart-button') //  # 9

    await navigationPromise

    await page.screenshot({
      path: 'amazon_cart.png' //  # 10
    });

    await page.waitFor(5000)

    await browser.close() // # 11
  })()
} catch (err) {
  console.error(err)
}
Here’s what’s going on:
- #1 — Here we launch Puppeteer and specify a number of settings in order to make debugging easier.
headless: falseallows us to control whether the browser should display when running the test, which is great for debugging and watching your test.slowMo: 100slows all interactions down so it’s easier to see what is happening in the test. - #2 — We navigate to Amazon, a number of options can be provided to the
gotomethod which control how to tell when the page is fully loaded. - #3 — We find the element with the id
twotabsearchtextboxand then type in our search term. Immediately after, we click the search button which has a classnav-input. - #4 — We wait for the list of search results to load. These will be all our awesome nyan cat hoodies.
- #5 — Here we take a screenshot of the available hoodies. The options object allows you to control the quality of the screenshot as well as whether the screenshot should be of the full page or a specific element.
- #6 — We use an evaluation function to find all the hoodies available as a list and then click the first link.
- #7 — Clothing usually comes in multiple sizes, and here we select the first size from the drop down.
- #8 — This is a random wait, which is needed because, when the size is selected from the dropdown it shifts the buy button which causes inconsistencies in clicking it. So we wait for the animation to complete.
- #9 & #10— We add the hoodie to our cart and snap a pic of it as proof.
- #11 — We close the browser to indicate that our Puppeteer test is completed.
To run this test, all we have to do is:
- Initialize a project using
npm init. - Install Puppeteer as a dependency using
npm install --save puppeteer. - Create a file called
amazon.jsand copy the above script into this file. - Run the test using
node amazon.js.
That’s it! Using this, we have a fully working automation test that tests a number of our back-end and front-end components, all with a simple, readable browser test. This test can easily be written using a different framework such as Flood Element since it’s actually built on Puppeteer. Additionally, using Element would let you use the script in a load test, when combined with a platform such as Flood.
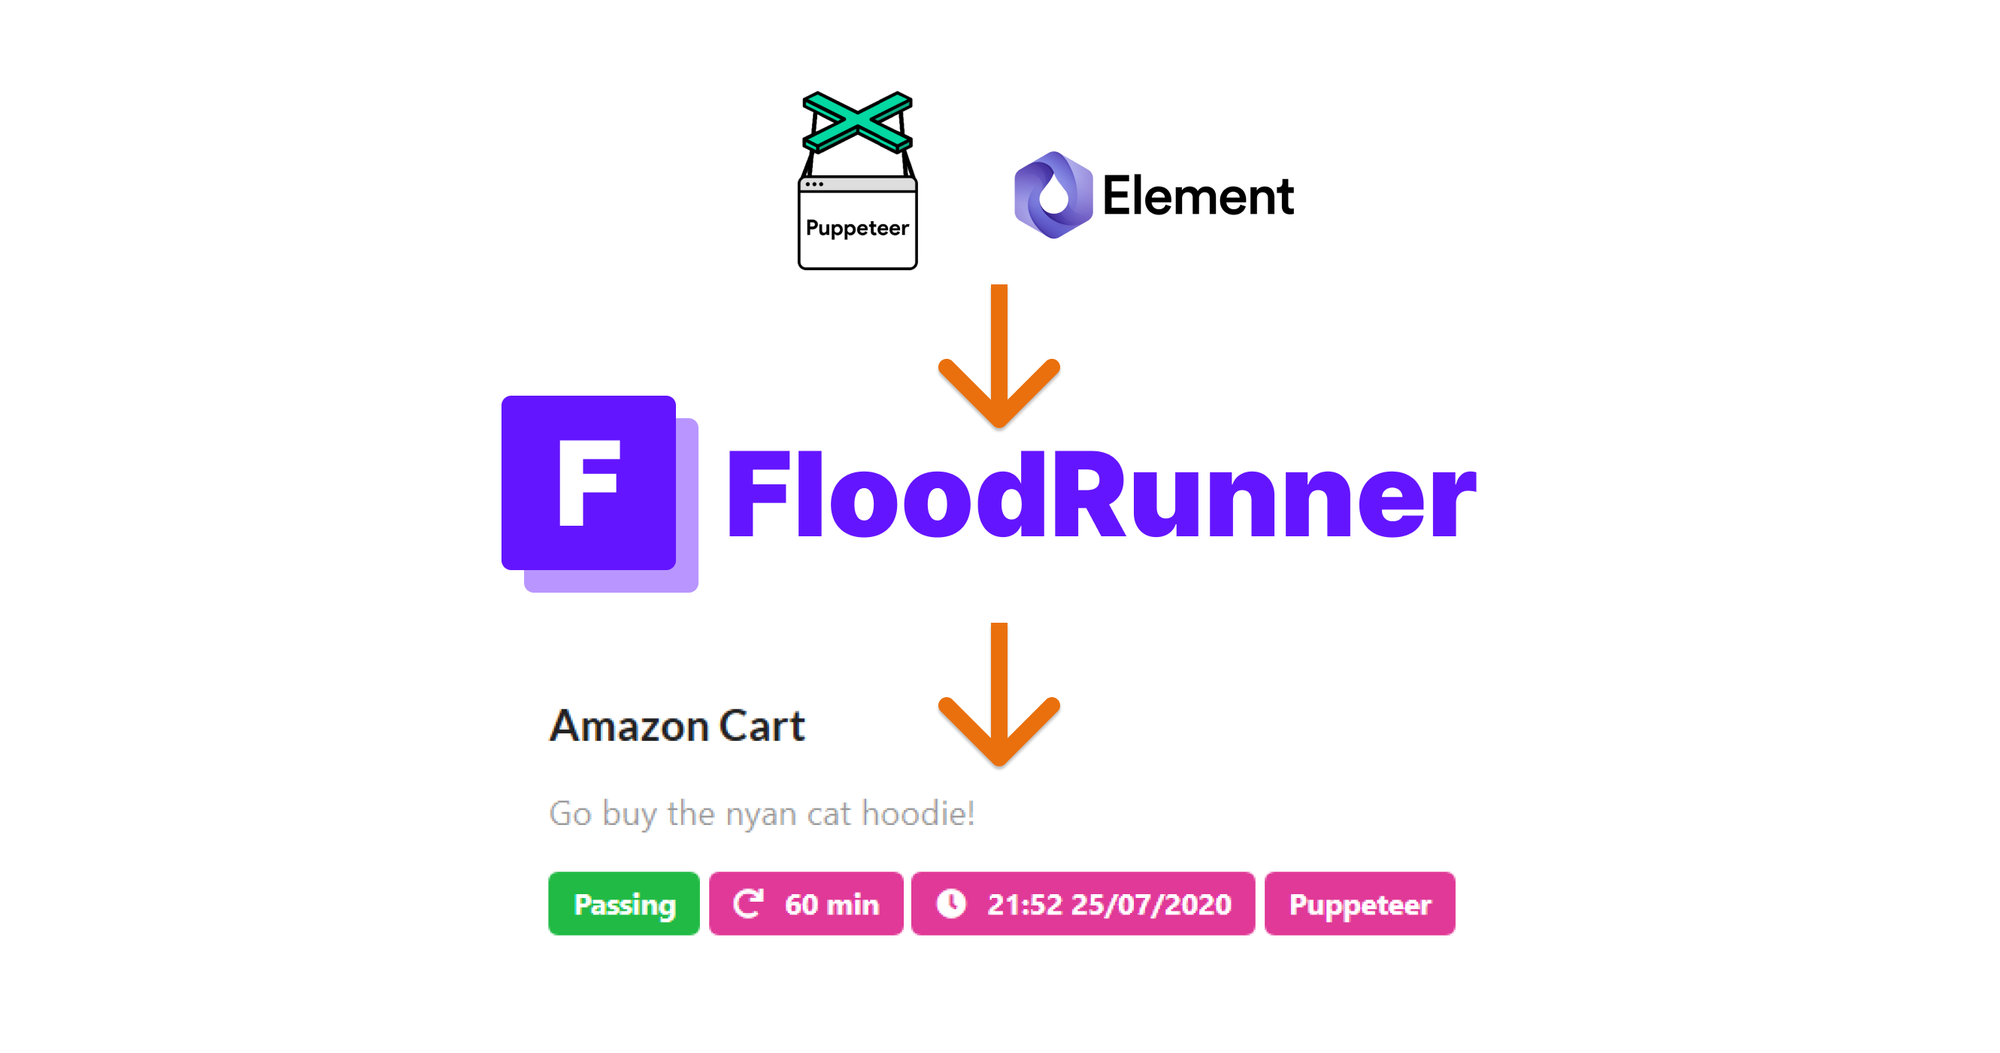
So what happens next? You’ve got a browser test, but you don’t want to be running this test manually every hour to check that your system is still running fine, right? That’s where FloodRunner is super useful.
Automated monitoring using FloodRunner
 FloodRunner
FloodRunner is an open-source framework for monitoring web applications using browser tests. The framework allows you to easily upload your browser tests and then schedule them to run continuously and alert you before your customers do! The process for using FloodRunner is really simple:

So, lets see that process in action, all you need to do is:
- Navigate to https://app.floodrunner.dev and sign in with Google/GitHub.
- Click Create Test, enter your test details and upload your test script.
- Let your test run and view the results of those test runs.
- Set alerts for your tests to get notified when they fail (alerts coming soon).
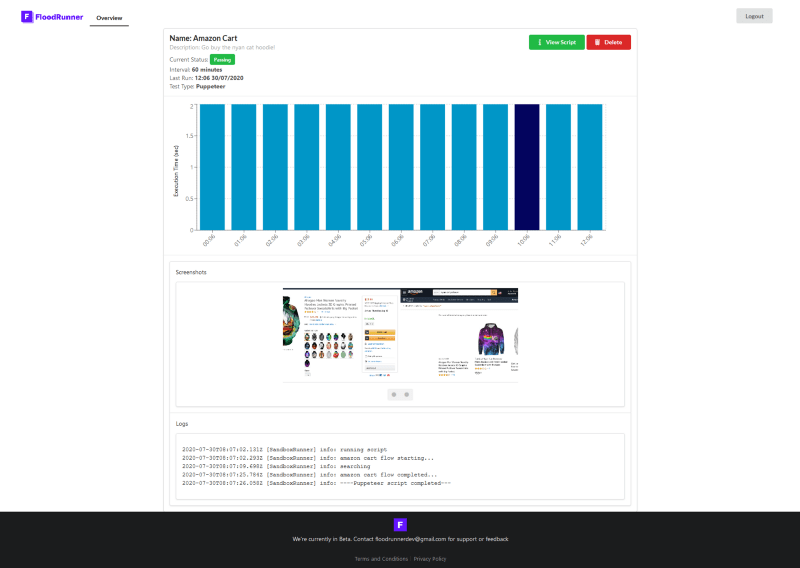
The results of the test will show you whether the test runs have passed/failed, the execution times, detailed logs and any screenshots that your test has taken. This gives you insight into how well your system is performing and whether it’s functionality is working as expected.
Where to from here?
Now that you’ve learnt about browser tests, what they can do for you and how to create them, you can start thinking about what the most critical aspects of your own system are.
Get started with FloodRunner 👾
Leave a comment and let me know your thoughts on the platform😸