Postman API with Newman in Azure DevOps
How to run Postman tests in a Continuous Integration environment using the Postman API and newman CLI.

If you've ever used Postman in your development workflow, you'll know what an amazing tool it is and the value it can add to testing your software.
Postman makes testing your API super simple, but what isn't so simple is how to run those Postman tests as part of your Continuous Integration environment.
Most of the guidance I've found online recommends downloading the collections you want to run and then adding them to your source control. This approach has two main drawbacks:
- Every time a developer makes a change to the collection, they have to download the collection, put it into source control and then open a PR. This becomes a huge pain especially when the changes you want to make are minor.
- The downloaded collection is just a JSON file and reviewing a JSON file in a PR is a terrible experience.
In this post, I'll describe an approach that will make running Postman tests in your CI much simpler. Specifically, the approach has the following goals:
- Be able to specify which Postman collections to run and against which Postman environment.
- Be able to specify if Postman collections should run sequentially if they depend on other collections or run in parallel for optimizing testing speed.
- Be able to keep collections in Postman and pull them via the Postman API.
Testing process overview
This post will describe creating the Postman testing process in Azure DevOps, but the approach can work in any CI environment.
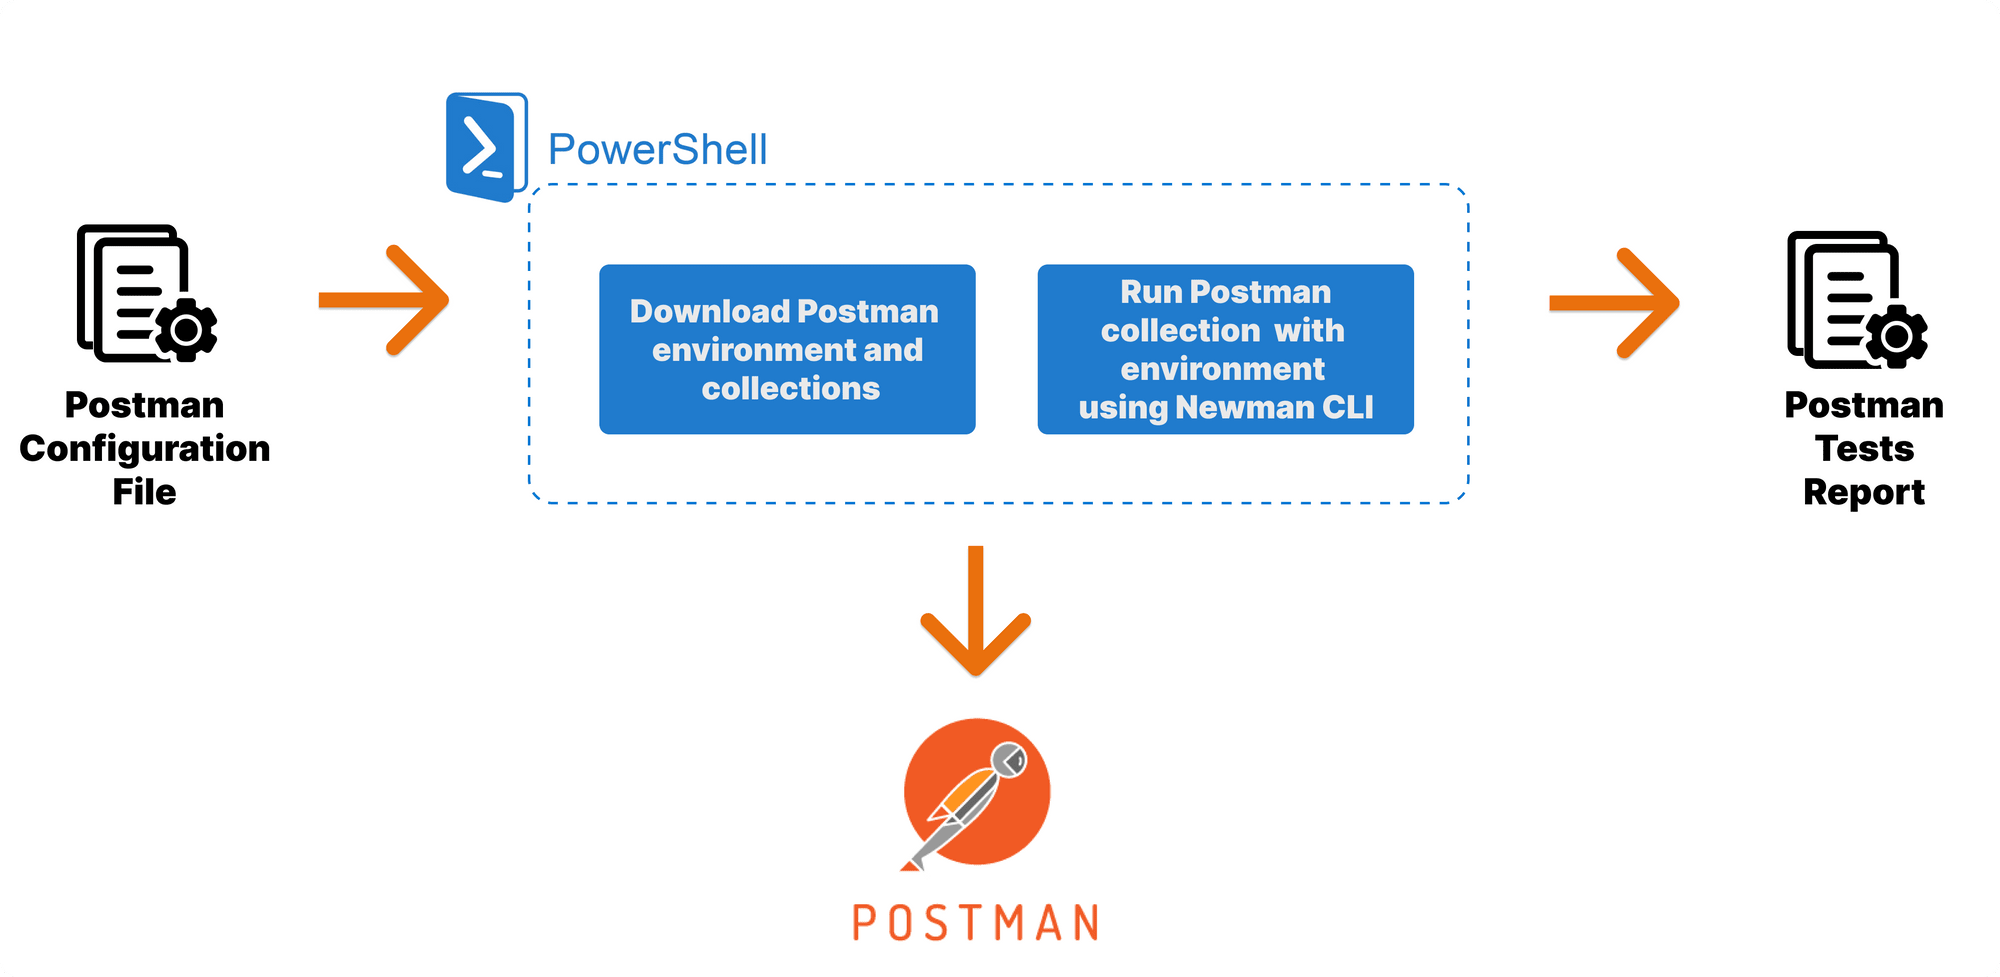
The approach has the following steps:
- Specify the environment and collections to run in a configuration file
- Download the required environment and collections using PowerShell and the Postman API
- Run each collection using the Newman CLI
- Output a test report to see the results of the test run
Building the testing process
In this section we'll go over how to create the testing process. If you'd like to just use the created process, then you can download the source code from the Github repo below and skip to the next section.
 javaadpatel
Creating the configuration file
The configuration file is a simple JSON file that allows you to specify the environment to use and the collections to run, taking into account their interdependence, if any.
{
  //remove the comments to make this valid JSON
  "environment":
    //environment required to run the specified collections
    {
      "name": "environment_name",
      "UID": "environment_UID"
    },
  "collections": [
    //each object specifies the collections to run and the environment to use for that collection, this allows you to chain collections that should
    //run in sequence and ones that can run in parallel
    {
      "collections": [
        {
          //display name so you can easily tell which collection this is
          "name": "collection1_name",
          //unique UID for this collection
          "UID": "collection1_UID"
        },
        {
          "name": "collection2_name",
          "UID": "collection2_UID"
        }
      ]
    },
    {
      "collections": [
        {
          "name": "collection3_name",
          "UID": "collection3_UID"
        }
      ]
    }
  ]
}
The naming of this file will follow the environment that you're executing the tests for and must have the following structure {environment}.postman_settings.json. So if you're executing tests against the dev environment this would be dev.postman_settings.json.
Creating the PowerShell script to run the Postman collections using Newman
The PowerShell script is a simple script that takes in your Postman API Key and the file path to your postman settings file.
It downloads the required environment, and iteratively goes through each collection running it using Newman and then generates a testing report.
<#
PowerShell script that takes in a configuration file
and executes the specified Postman collections using the Newman CLI
#>

param (
    [parameter(Mandatory = $true)] $PostmanAPIKey,
    [parameter(Mandatory = $false)] $PostmanSettingsFilePath = "Configuration/dev.postman_settings.json",
    [parameter(Mandatory = $false)] $DownloadDirectoryName = "Downloads"
)

# Get the PowerShell version
$powerShellVersion = $PSVersionTable.PSVersion
Write-Host "Running script using PowerShell version: $($powershellVersion)"

# Read the Postman settings file
Write-Host "Reading Postman settings from $($PostmanSettingsFilePath)"
$postmanSettings = Get-Content $PostmanSettingsFilePath | ConvertFrom-Json

# Download the environment to use for collections
$environmentFilePath = "$($DownloadDirectoryName)/environment.json"
Write-Host "Using environment: $($postmanSettings.environment.name)"

Invoke-WebRequest `
    -URI "https://api.getpostman.com/environments/$($postmanSettings.environment.UID)" `
    -Headers @{'X-Api-Key' = $PostmanAPIKey } `
    -OutFile $environmentFilePath

if ($powerShellVersion.Major -lt 7) {
    # Iterate through collection and run
    foreach ($collections in $postmanSettings.collections) {
        #execute sequential collections
        foreach ($sequentialCollection in $collections.collections) {
            Write-Host "Running collection: $($sequentialCollection.name)"

            $collectionFilePath = "$($DownloadDirectoryName)/$($sequentialCollection.name)_collection.json"
            $reportFilePath = "$($DownloadDirectoryName)/Reports/$($sequentialCollection.name)_JUnitReport.xml"

            Invoke-WebRequest `
                -URI "https://api.getpostman.com/collections/$($sequentialCollection.UID)" `
                -Headers @{'X-Api-Key' = $PostmanAPIKey } `
                -OutFile $collectionFilePath

            newman run $collectionFilePath `
                -e $environmentFilePath `
                -r 'cli,junitfull' `
                --reporter-junitfull-export $reportFilePath `
                --verbose
        }
    }
}
else {
    $postmanSettings.collections | ForEach-Object -Parallel {
        #execute sequential collections
        foreach ($sequentialCollection in $_.collections) {
            $postmanApiKey = $using:PostmanAPIKey
            $downloadDirectoryName = $using:DownloadDirectoryName
            $environmentFilePath = $using:environmentFilePath

            Write-Host "Running collection: $($sequentialCollection.name)"

            $collectionFilePath = "$($downloadDirectoryName)/$($sequentialCollection.name)_collection.json"
            $reportFilePath = "$($downloadDirectoryName)/Reports/$($sequentialCollection.name)_JUnitReport.xml"

            Invoke-WebRequest `
                -URI "https://api.getpostman.com/collections/$($sequentialCollection.UID)" `
                -Headers @{'X-Api-Key' = $postmanApiKey } `
                -OutFile $collectionFilePath

            newman run $collectionFilePath `
                -e $environmentFilePath `
                -r 'cli,junitfull' `
                --reporter-junitfull-export $reportFilePath `
                --verbose
        }
    } -ThrottleLimit 5
}
Creating the Azure DevOps pipeline
This step is specific to Azure DevOps and is where we create the Continuous Integration pipeline that actually executes the PowerShell script to run the Postman tests.
We break the pipeline into two components:
- Postman yml template - a reusable Azure DevOps template that encapsulates the logic to run the Postman testing process
- Azure DevOps main yml pipeline - defines the branches on which to trigger the pipeline and the main stages that should be run
Breaking the pipeline creation down into two distinct components allows us to apply a modular approach to building CI pipelines which helps with code maintenance and reusability.
The Postman yml template is a simple definition of steps:
- Install newman
- Install newman reporter
- Execute the PowerShell script to run the Postman tests
- Publish the tests results
parameters:
  - name: "environment"
    type: "string"
    displayName: "The name of the environment"

  - name: "vmImageName"
    type: "string"
    displayName: "The vm image for the pipeline"

  - name: "postmanApiKey"
    type: "string"
    displayName: "The Postman API Key to download the collections"

  - name: "downloadDirectory"
    type: "string"
    displayName: "The directory to download the environment, collections and reports into"
    default: ".azuredevops"

jobs:
  - job: PostmanTests
    displayName: Postman Test for ${{parameters.environment}}
    continueOnError: false
    pool:
      vmImage: ${{parameters.vmImageName}}
    steps:
      - task: Npm@1
        displayName: "Install Newman CLI"
        inputs:
          command: "custom"
          customCommand: "install newman -g"

      - task: Npm@1
        displayName: "Install Newman Reporter"
        inputs:
          command: "custom"
          customCommand: "install newman-reporter-junitfull -g"

      - task: PowerShell@2
        displayName: Execute Postman Collections
        inputs:
          filePath: "./.azuredevops/Templates/Scripts/newman-collection-runner.ps1"
          arguments: >
            -PostmanApiKey ${{parameters.postmanApiKey}}
            -PostmanSettingsFilePath "$(System.DefaultWorkingDirectory)/.azuredevops/Configuration/${{lower(parameters.environment)}}.postman_settings.json"
            -DownloadDirectoryName "${{parameters.downloadDirectory}}"

      - task: PublishTestResults@2
        displayName: "Publish Postman Test Results"
        condition: succeededOrFailed()
        inputs:
          testResultsFormat: "JUnit"
          testResultsFiles: "${{parameters.downloadDirectory}}/Reports/*_JUnitReport.xml"
          testRunTitle: "Postman Tests"
The main pipeline yml then simply defines which branches will cause it to trigger, and a single stage which runs the Postman template. You can see here we define a pipeline variable called environment which will match the name of the Postman settings file we've created.
###
# Azure DevOps pipeline to run Postman tests using Postman API and newman CLI
###

trigger:
  branches:
    include:
      - dev
  paths:
    exclude:
      - ".azuredevops/*"

variables:
  vmImageName: "windows-2019"
  environment: "Dev"

stages:
  - stage: PostmanTests
    displayName: Postman Tests
    jobs:
      - template: Templates/postman-template.yml
        parameters:
          environment: $(environment)
          vmImageName: $(vmImageName)
          postmanApiKey: $(postmanApiKey)
Configuring the testing process
Now that you have created the continuous integration pipeline, you can configure it to run your Postman collections.
This configuration requires 4 main steps:
- Generate a Postman API Key
- Assign the API Key as a pipeline variable
- Determine the environment and collection UID's using the Postman API
- Update the
{environment}.postman_settings.jsonfile with the UID's
So let's get your pipeline configured 🔨.
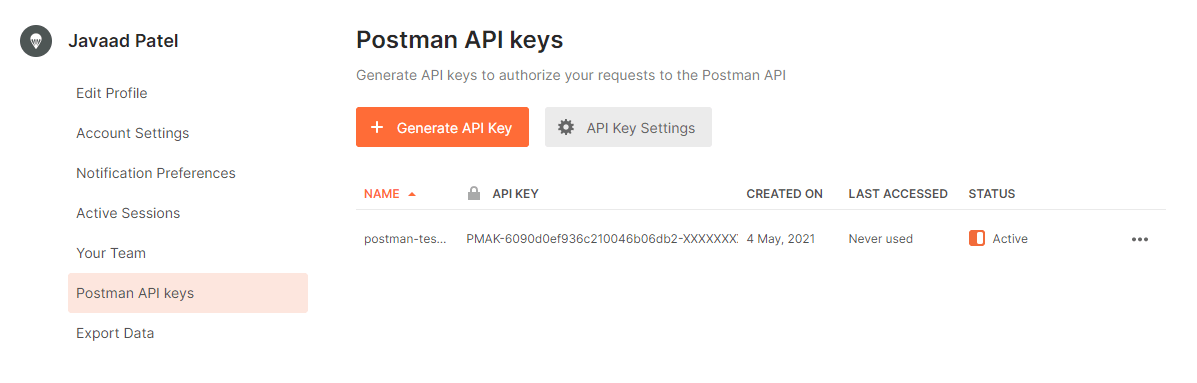
Generate a Postman API Key
The Postman API Key will allow you to read your collections and environments programmatically.
Postman has some great documentation showing you how to do this, so I'll just go over the basic steps.
First navigate to the API keys page, this should show you any previously generated API Keys.
On this page, just click Generate API Key and give your API Key a descriptive name.
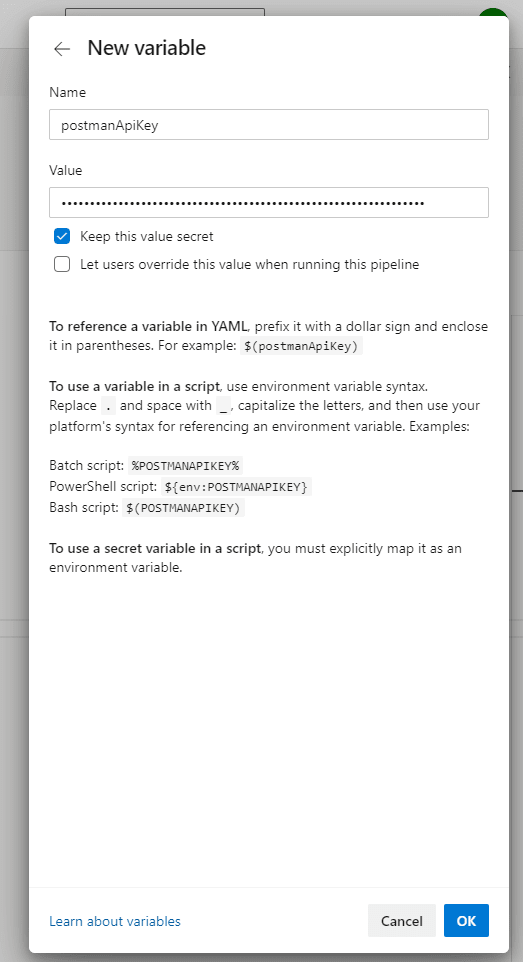
Assign the API Key as a pipeline variable
In Azure DevOps, you'll need to create a new pipeline variable called postmanApiKey, this ensures that your API key is kept out of source control.
NB. Mark tick "Keep this value secret" so that this API Key can't be easily leaked if someone gains access to your pipeline.
Determine the environment and collection UID's
In order for the PowerShell script in your pipeline to download the environment and collections, you need to reference them via their UID's (Unique Identifiers).
Postman unfortunately doesn't make this simple, so in order to get the UID's you need to query the Postman API.
To get the collection UID's, make a GET request to https://api.getpostman.com/collections and include a X-Api-Key header with your Postman API Key as shown below. This will bring back a list of all the collections you have access to and from that you can get get their respective UID's
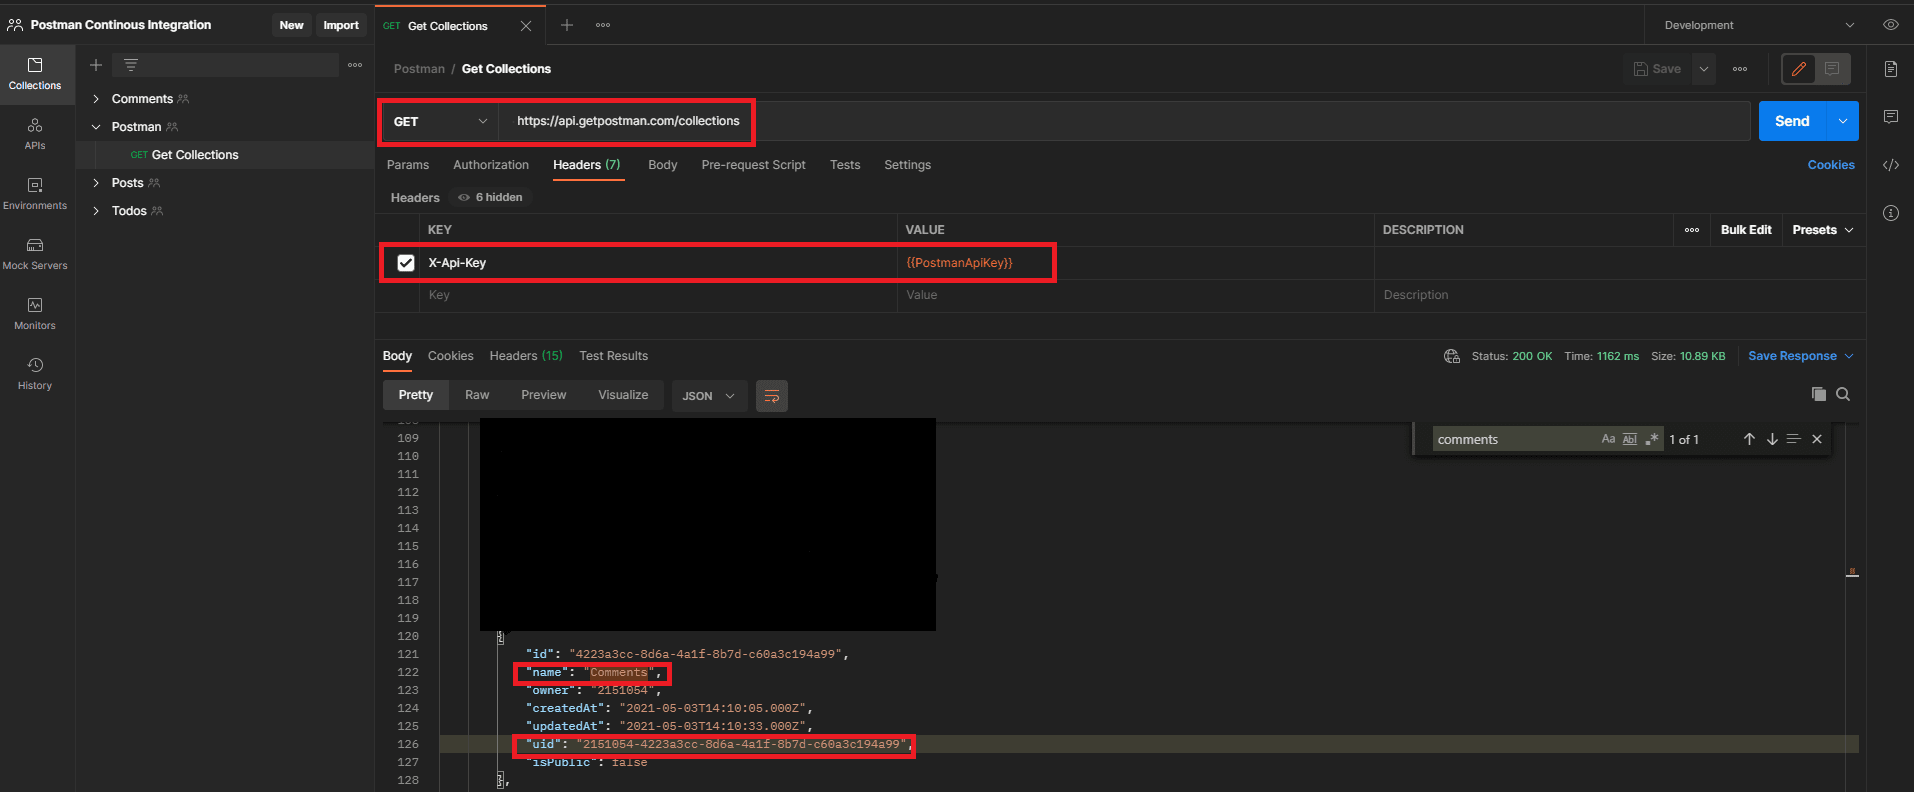
Similarly, to get the environment UID's, make a GET request to https://api.getpostman.com/environments and include a X-Api-Key header with your Postman API Key.
Update the postman settings file
Once you have your environment and collection UID's you can insert them into your postman settings file and name the file according to the environment that you're going to be testing against.
The environment name is specified in the CI pipeline and used as the prefix for the Postman settings file so that you can have multiple environments side by side if they differ for any reason.
Running the testing process
We're finally at the most exciting point, actually running the testing process. We'll break it down into two sections:
- Local development - for when you're actually creating/debugging your tests
- Azure DevOps pipeline - for when you're testing a branch or merging in a PR
Local Development
When you're developing locally you'll first want to install all the required npm dependencies using npm install in the project directory. The only required packages are newman and newman-reporter-junitfull for running and reporting on test runs.
Once you've got those dependencies installed, you can execute the PowerShell script and you should see the result of your test runs display in your terminal as below.

Continuous Integration Environment (Azure DevOps)
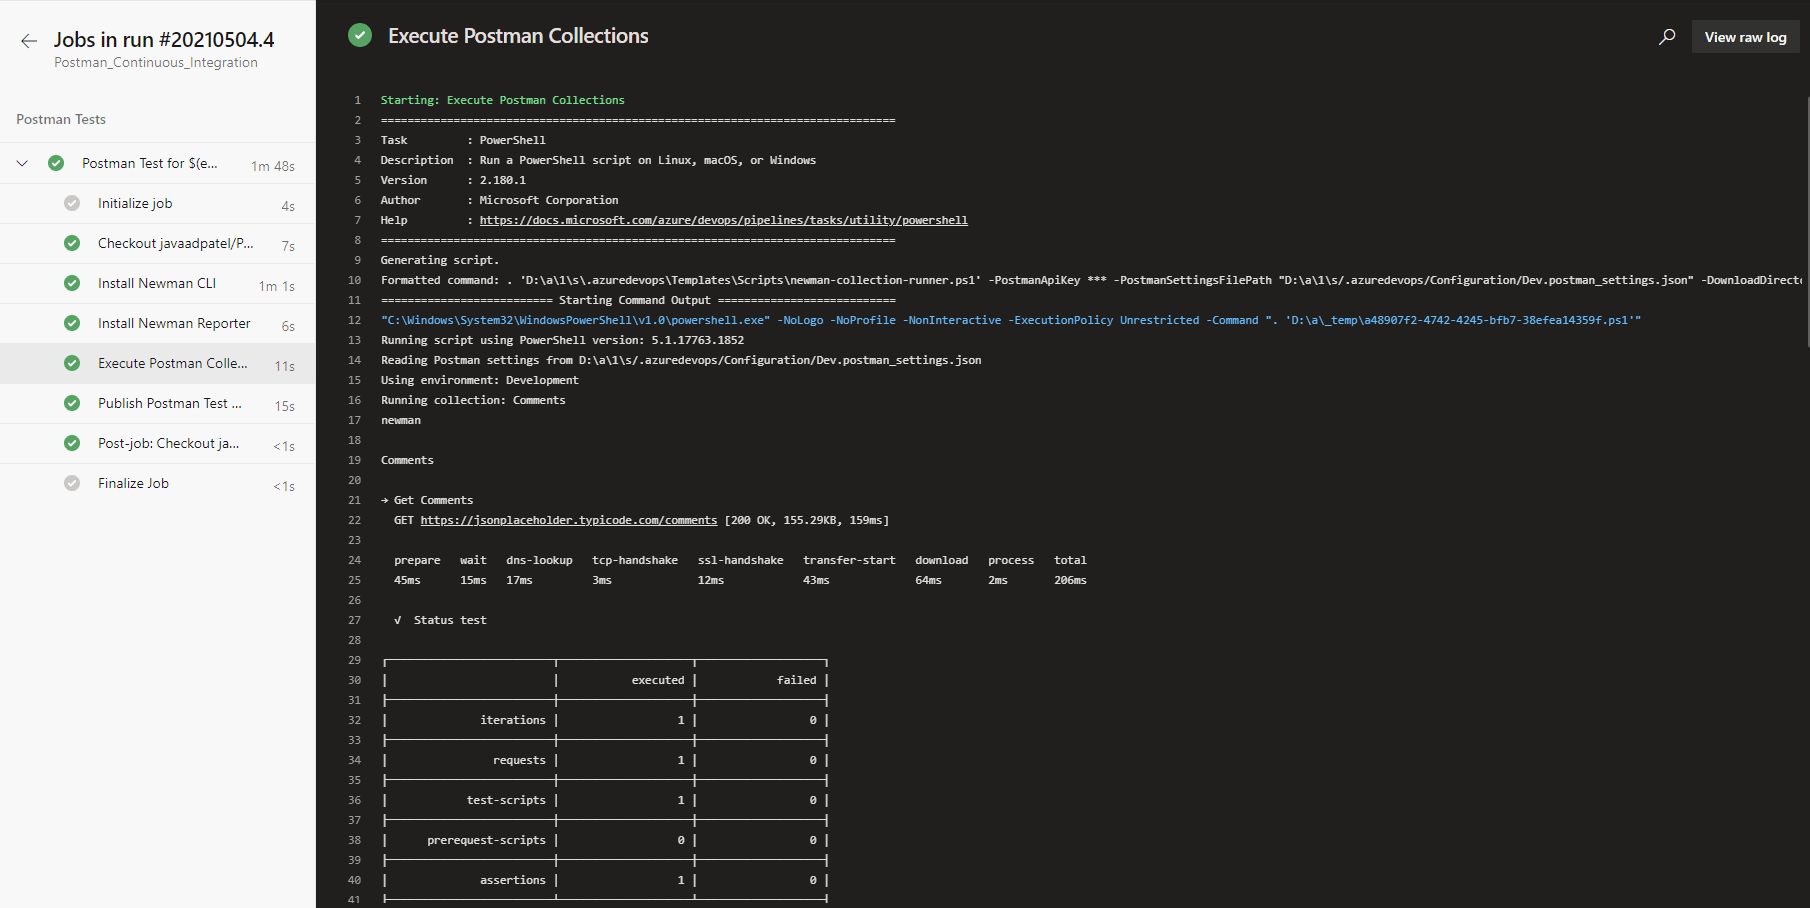
When you're ready to run your Postman tests in CI, simple kick off the pipeline build 🚀. This should then run all the required steps as shown below and successfully execute your Postman tests.
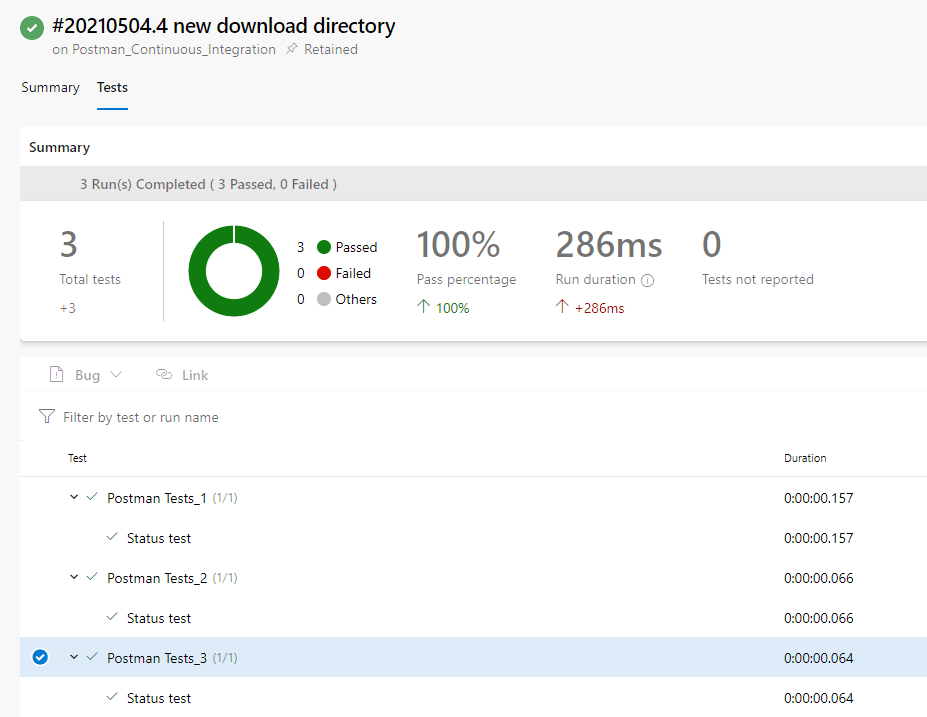
If you inspect the details of this specific pipeline run, under the Tests tab you'll see a list of all the tests that were run and the status of those tests.
That's all there is to running the pipeline. Now as you merge in PR's, the pipeline will execute and automatically run all of your Postman tests.
Summary
In this blog post we discussed an approach to integrate our Postman tests within a CI environment using the Postman API and newman CLI. This approach allows us to easily run our Postman tests in a reliable way and gives us better maintainability as tests are kept in Postman and we can use the built in source control for Postman.
Now that you have Postman tests integrated into your pipeline, you'll be able to leverage them to detect breaking changes to your codebase or as a stage gate for releasing to a UAT environment.
🌈🌈🌈🌈🌈🌈🌈🌈🌈🌈🌈🌈🌈🌈🌈🌈🌈🌈🌈🌈🌈🌈🌈🌈🌈🌈
As with all things, I'm sure that this approach could be improved on. If you have any ideas on how, please leave a comment or tweet me @javaad_patel