Securing Traefik Dashboard with Azure AD
Detailed walk-through of how to secure your Traefik dashboard running AKS with Azure AD

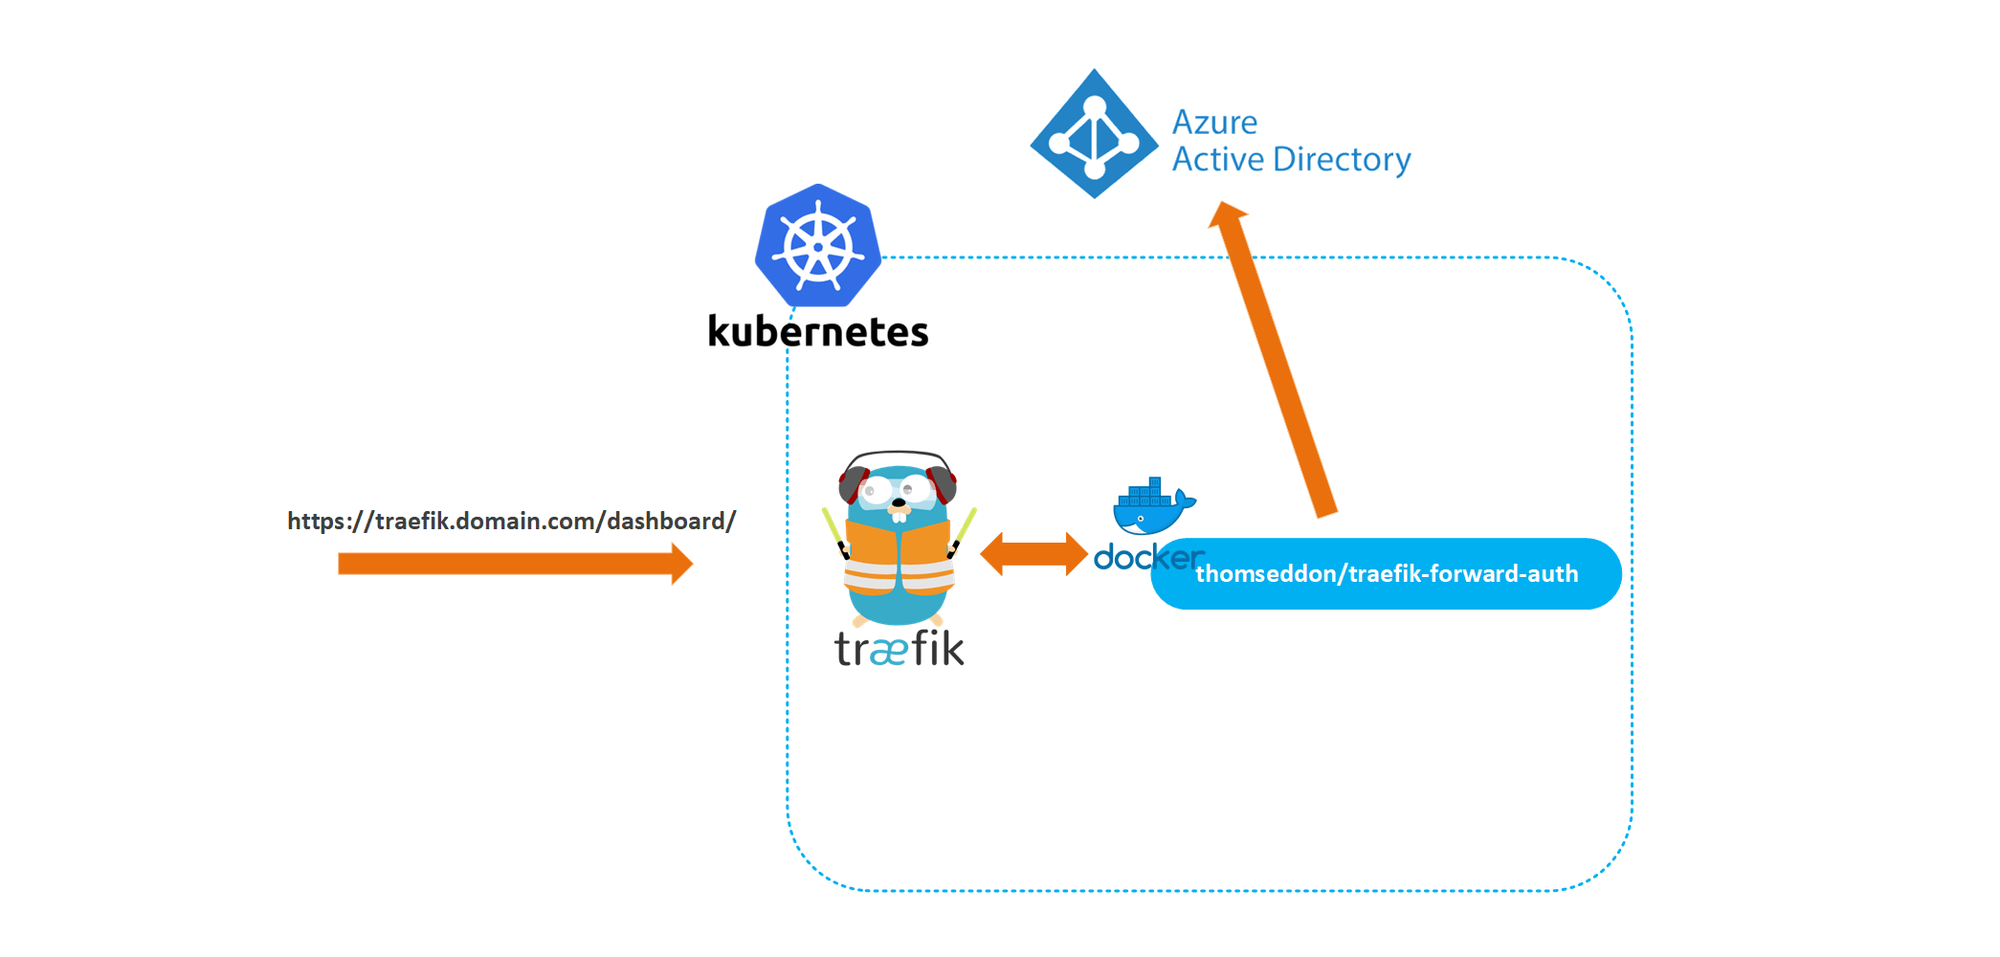
In my previous article, I went through the steps of deploying Traefik to an AKS cluster with Let’s Encrypt configured for automatic SSL. But, one of the things which I left out for the sake of simplicity was how to secure the Traefik dashboard. The Traefik dashboard allows you to easily visualize the services, middlewares and routers you have configured in your cluster and is definitely something you don’t want an attacker to access. So in this article, I’ll describe how to secure your Traefik dashboard with an oidc provider. Specifically, we will be using Azure Active Directory since our cluster is hosted in Azure.
The source code for this article can be found here:
 javaadpatel
Traefik Authentication
As described here, the dashboard can be secured using either Basic Authentication, Digest Authentication or Forwarded Authentication. We’ll be using Forwarded Authentication as this allows us to store our users in an external system, like Azure Active Directory.
NB. Traefik authentication can be applied to any service that Traefik is routing a request to, so this authentication would work equally well for services other than the dashboard
Authentication Server
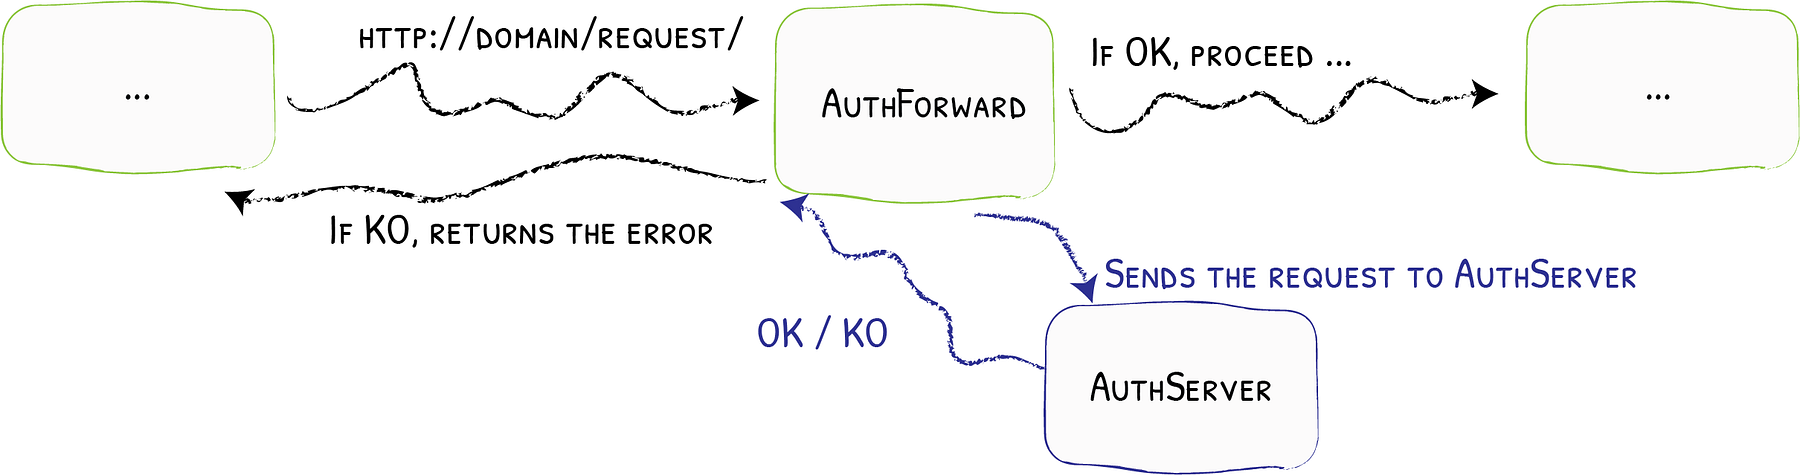
The forwarded authentication request can be handled by any application that is capable of receiving a request and then validating the user, and returning a 200 OK response. For the authentication server, we’ll be using the docker image thomseddon/traefik-forward-auth, which is a minimal authentication service that provides OAuth/SSO login and authentication specifically designed for Traefik authentication.
Authentication Setup
In order for us to secure the dashboard, we’ll have to do four things:
- Setup Traefik configuration to protect the dashboard and trust forwarded headers from select domains.
- Setup an Azure Active Directory application to handle user authentication.
- Setup the Authentication server.
- Setup a Traefik routing rule for requests going to the dashboard. Along with forwarded authentication middleware for sending requests to the authentication server.
Now that we understand the basics of how authentication will be accomplished, lets dive in.
1. Traefik Configuration
The Traefik configuration is shown below:
apiVersion: v1
kind: ServiceAccount
metadata:
  name: traefik-ingress-controller

---
kind: Deployment
apiVersion: extensions/v1beta1
metadata:
  name: traefik
  labels:
    app: traefik

spec:
  replicas: 1
  selector:
    matchLabels:
      app: traefik
  template:
    metadata:
      labels:
        app: traefik
    spec:
      serviceAccountName: traefik-ingress-controller
      containers:
        - name: traefik
          image: traefik:v2.1
          args:
            - --log.level=DEBUG
            - --api
            - --api.dashboard=true
            - --entrypoints.web.address=:80
            - --entryPoints.websecure.Address=:443
            - --entryPoints.websecure.forwardedHeaders.trustedIPs=<IP ADDRESS>
            - --certificatesResolvers.le.acme.dnsChallenge=true
            - --certificatesResolvers.le.acme.dnsChallenge.provider=cloudflare
            - --certificatesresolvers.le.acme.email=YOUREMAIL@DOMAIN.com
            - --certificatesresolvers.le.acme.storage=acme.json
            # Please note that this is the staging Let's Encrypt server.
            # Once you get things working, you should remove that whole line altogether.
            #- --certificatesresolvers.le.acme.caserver=https://acme-staging-v02.api.letsencrypt.org/directory
            - --providers.kubernetescrd # set kubernetes custom resource defintion as the provider
          ports:
            - name: web
              containerPort: 80
            - name: websecure
              containerPort: 443
            - name: admin
              containerPort: 8080
          env:
            - name: CF_API_EMAIL
              value: YOURCLOUDFLAREEMAIL@DOMAIN.com
            - name: CF_API_KEY
              valueFrom:
                secretKeyRef:
                  name: cloudflare-credentials
                  key: globalApiKey
---
apiVersion: v1
kind: Service
metadata:
  name: traefik
spec:
  type: LoadBalancer
  selector:
    app: traefik
  ports:
    - protocol: TCP
      port: 80
      name: web
      targetPort: 80
    - protocol: TCP
      port: 8080
      name: admin
      targetPort: 8080
    - protocol: TCP
      port: 443
      name: websecure
      targetPort: 443
The important things to note here are:
- The flag
api-dashboard=truespecifies that the dashboard should be enabled. - The setting
entryPoints.websecure.forwardedHeaders.trustedIPsspecifies which IP’s Traefik should accept forwarded headers from. One of the easiest ways to find this value is to use the whoami docker image we deployed in the previous article, and look at the X-Real-IP header. While developing you can instead set the flagentryPoints.web.forwardedHeaders.insecure, which tells Traefik to accept headers from any IP.
2. Azure Active Directory Setup
We’ll need to create a new application inside Azure AD so that we can authenticate users trying to access the Traefik dashboard. Running the below script will create an application named TraefikDashboardAuthentication in your Azure AD, create a secret used for authentication and grant it permissions to read users’ profiles.
# login to azure
az login

# variables
$replyUrls = "https://traefik.YOURDOMAIN.com/_oauth",  "https://traefikauth.YOURDOMAIN.com/_oauth"
$applicationName = "TraefikDashboardAuthentication"

# create application
$applicationRaw = az ad app create --display-name $applicationName --reply-urls $replyUrls
$application = $applicationRaw | ConvertFrom-Json
Write-Output "Successfully created Azure AD application";

# create application secret
$credentialsRaw = az ad app credential reset --id $application.appId --credential-description "traefikSecret"
$credentials = $credentialsRaw  | ConvertFrom-Json
Write-Output "Successfully created Azure AD application secret";


# add api permissions (Azure Active Directory -> User.Read permission)
$api = "00000002-0000-0000-c000-000000000000";
$apiPermissions = "311a71cc-e848-46a1-bdf8-97ff7156d8e6=Scope"
az ad app permission add --id $application.appId --api $api --api-permissions $apiPermissions

# grant api permissions (Azure Active Directory -> User.Read permission)
az ad app permission admin-consent --id $application.appId


Write-Output " -----------------------------"
Write-Output "Application Id: $($application.appId)"
Write-Output "Application Secret: $($credentials.password)"
Write-Output " -----------------------------"
The important thing to note here is that:
- The script will output the Application Id and the Application Secret which will be used as configuration parameters for our Authentication server. NB. The secret is only shown once and then hidden for security purposes so be sure to copy this secret for later use.
3. Authentication Server Setup
The authentication server, we’ll be using thomseddon/traefik-forward-auth will be deployed into our Kubernetes cluster. In order for the deployment to work successfully we need to configure some Kubernetes secrets which will be used by the authentication server as configuration inputs. Execute the following command in order to seed the required secrets.
kubectl create secret generic authenticationserver
--from-literal=issuerurl=https://sts.windows.net/<YOUR AZURE TENANT ID>/
--from-literal=clientid=<YOUR APPLICATION ID>
--from-literal=clientsecret=<YOUR CLIENT SECRET>
--from-literal=jwtsecret=<YOUR JWT SECRET>The important things to note here are:
- The Azure Tenant ID can be retrieved by executing the command
az account get-access-token --query tenant --output tsv. - The Application ID and Client Secret are the values that were output from the Azure AD application creation script run earlier.
- The JWT SECRET is used to sign the authentication cookie and can be any randomly generated value. If you have open ssl installed you can easily generate one by running the command
openssl rand -hex 16.
Now we’re ready to deploy our authentication server.
kind: Deployment
apiVersion: extensions/v1beta1
metadata:
  name: traefikauth
  namespace: default
  labels:
    app: containous
    name: traefikauth
spec:
  replicas: 1
  selector:
    matchLabels:
      app: containous
      task: traefikauth
  template:
    metadata:
      labels:
        app: containous
        task: traefikauth
    spec:
      containers:
        - name: traefikauth
          image: thomseddon/traefik-forward-auth:2
          ports:
            - containerPort: 4181
              protocol: TCP
          env:
            - name: DEFAULT_PROVIDER
              value: "oidc"
            - name: PROVIDERS_OIDC_ISSUER_URL
              valueFrom:
                secretKeyRef:
                  name: authenticationserver
                  key: issuerurl
            - name: PROVIDERS_OIDC_CLIENT_ID
              valueFrom:
                secretKeyRef:
                  name: authenticationserver
                  key: clientid
            - name: PROVIDERS_OIDC_CLIENT_SECRET
              valueFrom:
                secretKeyRef:
                  name: authenticationserver
                  key: clientsecret
            - name: SECRET
              valueFrom:
                secretKeyRef:
                  name: authenticationserver
                  key: jwtsecret
            - name: LOG_LEVEL
              value: trace
          resources:
            limits:
              memory: "512Mi"
              cpu: "500m"
---
apiVersion: v1
kind: Service
metadata:
  name: traefikauth
  namespace: default

spec:
  ports:
    - name: http
      protocol: TCP
      port: 80
      targetPort: 4181
  selector:
    app: containous
    task: traefikauth
---
apiVersion: traefik.containo.us/v1alpha1
kind: IngressRoute
metadata:
  name: traefikauth-route
  namespace: default
spec:
  entryPoints:
    - web
    - websecure
  routes:
    - match: Host(`traefikauth.YOURDOMAIN.com`)
      kind: Rule
      services:
        - name: traefikauth
          port: 80
  tls:
    certResolver: le
    domains:
      - main: YOURDOMAIN.com
        sans:
          - "*.YOURDOMAIN.com"
The important thing to note here is that:
- The authentication server makes use of Traefik Host Header routing rule, so you’ll need to input your domain name into the configuration so the routing works correctly.
Once the authentication server has been successfully deployed, you’ll need to add a DNS record so that the URL https://traefikauth.YOURDOMAIN.com resolves to your Traefik external IP address.

4. Traefik Dashboard Routing and Authentication Middleware Setup
Finally, we will need to setup a routing rule so that when we try and access https://traefik.YOURDOMAIN.com it will be redirected to the Traefik service running inside our cluster. Additionally, we also need to configure the request to flow through our authentication middleware.
apiVersion: traefik.containo.us/v1alpha1
kind: IngressRoute
metadata:
  name: traefik-dashboard
spec:
  entryPoints:
    - web
    - websecure
  routes:
    - match: Host(`traefik.YOURDOMAIN.com`)
      kind: Rule
      services:
        - name: api@internal
          kind: TraefikService
      middlewares:
        - name: auth
  tls:
    certResolver: le
    domains:
      - main: YOURDOMAIN.com
        sans:
          - "*.YOURDOMAIN.com"

---
apiVersion: traefik.containo.us/v1alpha1
kind: Middleware
metadata:
  name: auth
spec:
  forwardAuth:
    address: https://traefikauth.YOURDOMAIN.com/_oauth
    trustForwardHeader: true
    authResponseHeaders:
      - X-Forwarded-User
The important things to note here are:
- The Middleware is created and uses the address property to point to our authentication server. We then configure the middleware to trust forwarded headers coming from our authentication server and tell Traefik that we specifically want to copy the response header X-Forwarded-User.
- We need to setup a CNAME for traefik so that our requests to https://traefik.YOURDOMAIN.com will resolve correctly.
With everything configured we should now be able to access the Traefik dashboard on :
https://traefik.yourdomain.com/dashboard/
This should then result in the request being redirected to Azure AD, and once you authenticate successfully you will be redirected to the Traefik dashboard.

Conclusion
We now have a fully secured Traefik dashboard with our authentication handled by Azure Active Directory, allowing us to easily manage access to the dashboard.