Beginners guide to building high availability systems in Azure - Part 2: Terraform Configuration
Learn how to use Terraform to build high availability systems.


This post is part of a series, checkout the other posts:
* Part one: Understanding availability concepts in Azure
What is availability and what makes a system highly available? How do you design and build systems that are highly available? Those are the questions that we'll answer in this series of blog posts.
In the previous post, we discussed availability concepts and how this applies to a cloud environment, like Azure. We went through what availability is, core availability concepts, and different architectures to achieve high availability in Azure.
In this post, we'll explore a strategy to achieve high availability using Terraform as our Infrastructure as Code (IAC) tool. We'll configure and deploy a high availability architecture in Azure. To understand high availability in practice, we'll simulate an Azure region failure and see how our application handles this.
If you're new to Terraform this will be the perfect post for you as we'll learn how to install Terraform, how Terraform modules and Terraform variables work, and Terraform best practices.
By the end of this post, you'll have a practical understanding of how we can use Terraform to build highly available systems.
If you already understand Infrastructure as Code and how to use Terraform, you can find the complete Terraform configuration for a high availability architecture on my GitHub.
 javaadpatel
Infrastructure as code for high availability
Infrastructure as code is a way to declaratively define your infrastructure. This means that instead of manually creating your infrastructure you instead define what should be in your environment and how it should be configured.
There are a wide variety of IAC tools, one of the most popular ones, and the one we'll cover in this post is Terraform. Terraform allows you to declare your infrastructure in tf configuration files using the HashiCorp Configuration Language (HCL).
But why use IAC? Well, IAC has some of the following advantages:
- The ability to reliably recreate environments in the case of disaster recovery - the scenario we'll be exploring.
- Consistency between your environments, the only differing factor being the actual configuration settings between them.
- Limiting production permissions as only the identity associated with the IAC tool will have permissions to make changes - thereby limiting your attack surface.
- Source control of your environment and being able to review changes to environments as PR's would have to be made to apply the changes.
How we can use IAC to achieve high availability
Once we have our environment fully defined as configuration we can reliably recreate it on demand. This allows us to create an active/passive architecture with the lowest cost as we'll only deploy our secondary environment (aside from the database replication) when we experience regional failure.
To understand the architecture we'll be deploying, check out the previous post where we discuss the different types of architecture to achieve high availability.
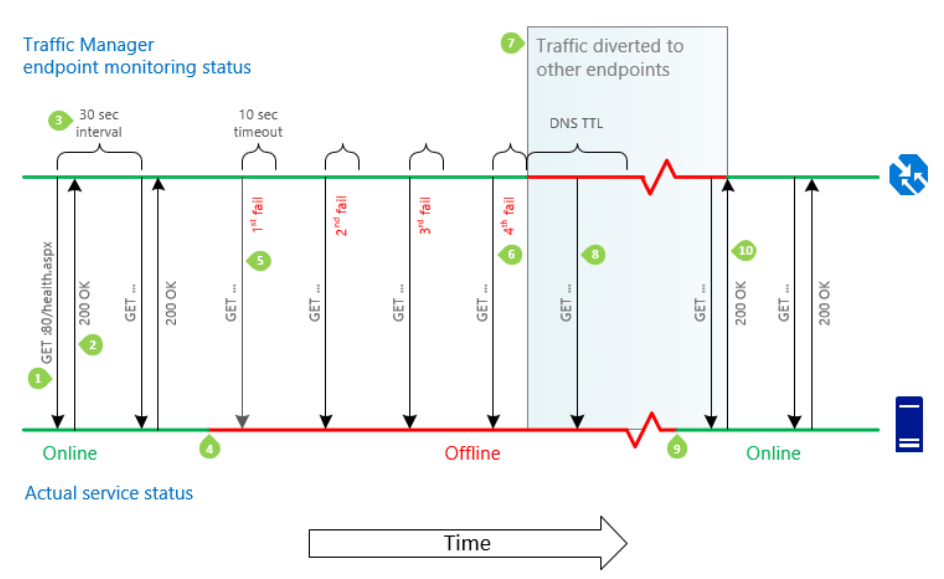
The Azure Traffic Manager (ATM) checks for endpoint health based on the pattern shown below. It can be configured in several different routing configurations, we'll be using priority routing so all traffic will be routed to the primary region until there is a regional failure - learn more about different routing methods.
It will ping a health endpoint on the web application and if it receives a successful response will route traffic to the web application. After several failed responses (configurable), it will route traffic to a different web application - the one in our secondary region.
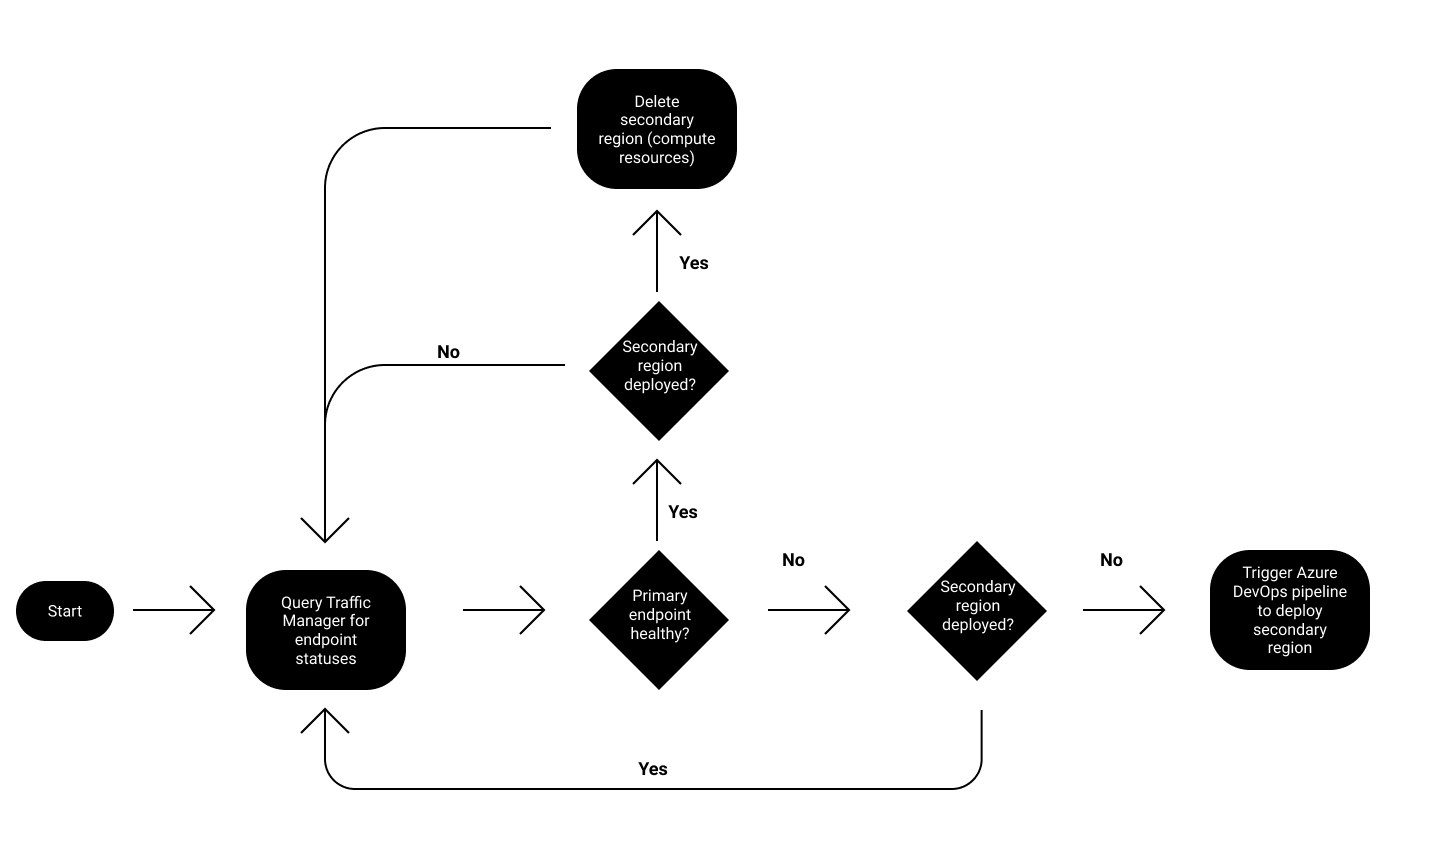
To take advantage of this ability to route between different regions we'll set up a serverless function using Azure Functions to monitor the endpoint health reported by ATM. When we detect that the primary region has failed, we'll then trigger our Azure DevOps pipeline to deploy to our secondary environment - creating both infrastructure and deploying our application code. ATM will then identify the secondary region as being a viable route and start routing all traffic to this region, hence successfully failing over.
The detailed flow for how we will redirect traffic to our secondary region can be seen below.
High availability architecture using Terraform
It's time to take the concepts we've learned and apply them. We'll build our architecture using Terraform using a progressive approach. First covering how to install Terraform, how to set up a folder structure, how to store our state consistently for developing as a team. Then we'll create the Terraform configuration files for each of our Azure infrastructure components. Finally, we'll simulate what happens when our primary region fails and how we can easily fail over to our secondary region.
To keep this post focused primarily on the Terraform configuration, I'll be skipping how to configure Terraform inside an Azure DevOps pipeline and the automation aspects of how to detect a failed region.
If you'd like to check out the repository you can find it here:
 javaadpatel
Installing Terraform onto your local machine
Installing Terraform is simple as it runs as a single binary file called terraform. Simply go to the latest packages for terraform, download the package for your OS, unzip it and then add that directory to your PATH, that way you'll be able to use the terraform cli from any directory.
Once you have added it to your PATH, open a command prompt and execute the command terraform -version to check that it is installed correctly.
Setting up a Terraform folder structure
Before we begin creating our Terraform configuration lets first create the basic folder structure to house our configuration.
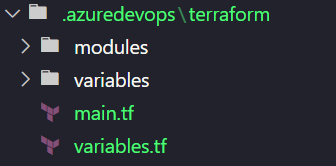
On your machine create the following files and folders:
main.tfwill be the entry point coordinating all our infrastructure logic.variables.tfwill hold all the variables we'll use in our configuration files.- The
variablesfolder will hold environment-specific variables eg. variables for deploying to our development environment or our production environment. - The
modulesfolder will contain custom modules that we create to organize our resource configuration-specific files. These modules will then be referenced from ourmain.tffile.
Setting up an Azure storage account for Terraform state
To easily collaborate with other members of your team you'll want to store your Terraform state in a cloud-based storage. Since we're using Azure we'll use Azure Blob Storage to store our state.
Inside our main.tf file lets add the following code:
# Configure the Azure provider
terraform {
  required_providers {
    azurerm = {
      source  = "hashicorp/azurerm"
      version = "=2.26"
    }
  }

  backend "azurerm" {
  }

  provider "azurerm" {
  skip_provider_registration = true
  features {}
  }
}
We define the required providers using the required_providers block and specify that we require the azurerm provider to deploy our Azure resources. We also define a backend that specifies where we'll store our state which Terraform uses to track the state of resources it is managing.
Next, we specify the details for the Azure Blob Storage account where we want to store our Terraform state. For this we create a folder called backends under the variables folder and create a file called dev.backend.tfvars with the following code:
NB. You'll need to create an Azure Storage account in a resource group for this next part.
resource_group_name  = "<Resource group with our Azure Storage account>"
storage_account_name = "<Azure Storage account name>"
container_name       = "<Azure Storage container name>"
key = "<Blob name used to store Terraform state>"At this point we can initialize our Terraform configuration using the command terraform init -backend-config="./variables/backends/dev.backend.tfvars". If you receive an error (shown below) then you'll need to install the Azure CLI to continue.
Error: Error building ARM Config: Please ensure you have installed Azure CLI version 2.0.79 or newer. Error parsing
json result from the Azure CLI: Error launching Azure CLI: exec: "az": executable file not found in %PATH%.
If the initialization command is successful you should see something similar to the following output:
Initializing the backend...

Successfully configured the backend "azurerm"! Terraform will automatically
use this backend unless the backend configuration changes.

Initializing provider plugins...
- Finding hashicorp/azurerm versions matching "2.26.0"...
- Installing hashicorp/azurerm v2.26.0...
- Installed hashicorp/azurerm v2.26.0 (signed by HashiCorp)

Terraform has created a lock file .terraform.lock.hcl to record the provider
selections it made above. Include this file in your version control repository
so that Terraform can guarantee to make the same selections by default when
you run "terraform init" in the future.

Terraform has been successfully initialized!
Defining a high availability architecture using Terraform
To set up our high availability architecture we need to provision the following Azure components:
- Azure Traffic Manager for load balancing. This is region agnostic.
- Azure App Service as our web application. This will be deployed into one region and when that region fails, we will trigger a deployment into another region.
- Azure CosmosDb as our database. This will be replicated to our secondary region.
We'll tackle each of these individually, creating a submodule for each of them so we can coordinate the infrastructure creation at a high level through our main.tf (ie. root module) file.
For the sake of brevity, I'll only include the most interesting parts of each Terraform configuration. If you'd like to see the full file then please reference the GitHub repository.
Terraform configuration for Azure App Service
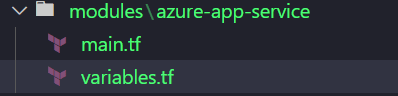
For our Azure App Service configuration, lets first create a folder for our configuration called azure-app-service in our modules directory. Inside this folder, we create a main.tf and variables.tf file. Our directory structure will now look like this:
In the main.tf file, we first create the Azure App Service plan using:
# create app service plan
resource "azurerm_app_service_plan" "app_service_plan" {
  kind     = "Linux"

  sku {
    tier = var.app_service_plan_sku.tier
    size = var.app_service_plan_sku.size
  }
  ...
}
The resource block is used to define a resource that we want to create along with its configuration. We can reference variables that we'll pass in from our root module with the syntax var.variable_name. This allows us to keep these modules highly re-usable. We configure the App Service type using the kind property, specifying we want a Linux OS and also define our sku.
We then add the configuration for the Terraform configuration for our Azure App service:
# create azure app service
resource "azurerm_app_service" "app_service" {
  app_service_plan_id = azurerm_app_service_plan.app_service_plan.id

  app_settings = merge(var.application_settings, {
    "APPINSIGHTS_INSTRUMENTATIONKEY" = azurerm_application_insights.app_insights.instrumentation_key
  })

  ...
}
In the above snippet, we reference the App Service Plan we created using the name of the module (azurerm_app_service_plan) and the alias we defined (app_service_plan). This way we can associate our App Service to the App Service Plan we created.
One interesting thing here is that for the app_settings we use a built-in Terraform function called merge to merge the application settings we will pass in (eg. our database connection string) with the application insights key of the application insights we just created.
Next, we add variable definitions to our variables.tf file, as follows:
# General
variable "resource_group_name" {
  type        = string
  description = "The resource group that app service should be deployed into"
}
...
Our variables.tf defines all the variables that our resource blocks require. We use the variable block to define a variable. There are several properties you can set on a variable, if you're interested you can learn more about using terraform for parameterizing configuration files and associated Terraform best practices.
Terraform configuration for Azure Cosmos DB
As we've done for our Azure App Service, we can create a module for our Azure Cosmos Db called azure-cosmosdb under our modules directory, with a main.tf and variables.tf file. In our main.tf file we can insert the following code:
resource "azurerm_cosmosdb_account" "db" {
  enable_automatic_failover = true

  consistency_policy {
    consistency_level = "Eventual"
  }

  geo_location {
    location          = var.secondary_location
    failover_priority = 1
  }

  geo_location {
    location          = var.primary_location
    failover_priority = 0
  }

  ...
}

output "endpoint" {
  value     = azurerm_cosmosdb_account.db.endpoint
  sensitive = false
}
There are a couple of important things to note in the above configuration. We set the property enable_automatic_failover=true so that when our primary region goes down, Cosmos Db will automatically handle failing over to our secondary region. Technically, we can replicate the data to any number of regions, you can see we define a geo_location block to specify which regions we should replicate to and what the priority is. One other important thing is we define an output variable, this will allow us to easily get access to the connection endpoint of the Cosmos Db account that we've just created so that we can add it to our Azure App Service application settings.
Terraform configuration for Azure Traffic Manager
Once again we create a module for this called azure-traffic-manager and in our main.tf we insert the following code:
# Configure traffic manager profile
resource "azurerm_traffic_manager_profile" "profile" {
  traffic_routing_method = "Priority"

  monitor_config {
    protocol                     = "https"
    port                         = 443
    path                         = "/"
    interval_in_seconds          = 30
    timeout_in_seconds           = 9
    tolerated_number_of_failures = 3
  }
  ...
}
In the above snippet, we define our Azure Traffic Manager profile and also configure how the health probe will run. The health probe, configured via the monitor_config block, needs to match the health endpoint you intend to expose on your Azure App Service so that Traffic Manager can detect whether the application is still available for traffic. We also see property traffic_routing_method = "Priority" this means that when we define our endpoints it will route all traffic to the highest priority endpoint and only failover when it is degraded.
Terraform configuration for Azure Traffic Manager Endpoints
Our last module is the azure-traffic-manager-endpoint module. Usually, we'd just define this inside the Traffic Manager module, but because of how we want to use our configuration to only deploy to the secondary region when we detect the primary region has failed, it's easier to set it up as a separate module.
For the main.tf we insert the following code:
resource "azurerm_traffic_manager_endpoint" "endpoint" {
  type                = "azureEndpoints"
  target_resource_id  = var.endpoint_id
  priority            = var.priority
  ...
}
In the above snippet, we define an endpoint that Azure Traffic Manager can route traffic to. We set type=azureEndpoints since we'll be directing traffic to an Azure App Service and this allows Azure Traffic Manager to automatically detect the URL to send to based on the resource's id, which we define in the property target_resource_id. We also use the priority property to define which is the primary and which is the secondary endpoint.
Terraform configuration for our root module
Now that we've defined all our submodules we can tie everything together with the root module which will coordinate all the infrastructure creation logic.
In our main.tf, we first define a data block. This is a way to reference something that isn't directly managed by the current Terraform configuration ie. Something created by another process, either another Terraform configuration or manually. We use this data block to get details of the current Azure subscription we'll be deploying into so that we can generate our Azure App Service endpoint ids.
data "azurerm_subscription" "current" {
}
After this, we define a locals block which we can use to calculate variables that we will use later on in our Terraform configuration. We compute all the resource names by appending the region the resource is deployed into, for region-specific resources. For example, our Azure App Service name might be my-app-service, and we will have two instances, one in West Europe and one in North Europe (Azure paired region), so we can compute the names for our two app services as my-app-service-westeurope and my-app-service-northeurope. We also calculate the ids of our primary and secondary endpoint which we'll use when we configure our Azure Traffic Manager endpoint resources.
locals {
  primary_location_formatted   = replace(lower(var.primary_location), " ", "")
  secondary_location_formatted = replace(lower(var.secondary_location), " ", "")

  app_service_name_primary   = "${var.app_service_name}-${local.primary_location_formatted}"
  app_service_name_secondary = "${var.app_service_name}-${local.secondary_location_formatted}"

  subscription_id       = data.azurerm_subscription.current.subscription_id
  primary_endpoint_id   = "/subscriptions/${local.subscription_id}/resourceGroups/${azurerm_resource_group.rg.name}/providers/Microsoft.Web/sites/${local.app_service_name_primary}"
  secondary_endpoint_id = "/subscriptions/${local.subscription_id}/resourceGroups/${azurerm_resource_group.rg.name}/providers/Microsoft.Web/sites/${local.app_service_name_secondary}"
  ...
}
We then use the module blocks to configure each of our Azure resources. The source property is used to specify the location of our modules. This also allows us to reference any third-party Terraform modules that the community has created.
# Configure CosmosDB
module "cosmosdb" {
	source = "./modules/azure-cosmosdb"
	...
}

# Configure Azure App Service
# Primary region app service
module "app_service_primary" {
	source = "./modules/azure-app-service"
	...
}

# Secondary region app service (only deployed if its a secondary deployment)
module "app_service_secondary" {
  	source = "./modules/azure-app-service"
  	count  = var.is_primary_deployment ? 0 : 1
	...
}

# Configure Azure Traffic Manager Profile
module "traffic_manager_profile" {
	source = "./modules/azure-traffic-manager"
	depends_on = [
    	module.app_service_primary
	]
	...
}

module "primary_endpoint" {
  	source = "./modules/azure-traffic-manager-endpoint"
  	depends_on = [
    	module.traffic_manager_profile
	]
	priority            = 1
	...
}

module "secondary_endpoint" {
  	source = "./modules/azure-traffic-manager-endpoint"
  	count  = var.is_primary_deployment ? 0 : 1
  	depends_on = [
    	module.app_service_secondary,
  	]
	priority            = 2
    ...
}
We use the variable var.is_primary_endpoint to determine whether we should deploy the resources into our secondary region. This evaluation is done using the count property, where a count of zero would mean that we don't need to deploy this resource.
Deploying a high availability infrastructure using Terraform
Okay, its finally time to deploy our high availability architecture using Terraform.

In our variables folder, we create a file called dev.tfvars where will insert all the settings we require. Here is an example of the settings I've used to deploy into my environment:
resource_group_name = "high-availability"
primary_location    = "West Europe"
secondary_location  = "North Europe"

app_service_plan_name = "high-availability"
app_service_plan_sku = {
  tier = "Standard"
  size = "S1"
}

app_service_name                      = "high-availability-terraform-javaad"
app_service_application_insights_name = "high-availability-terraform-javaad"
cosmosdb_account_name                 = "high-availability-cosmosdb-javaad"
traffic_manager_profile_name          = "high-availability-terraform"
In the snippet above, we define the two regions we want to deploy into for high availability.
Additionally, we create two more files dev.primary.tfvars and dev.secondary.tfvars which have one setting to specify whether this is a primary region or secondary region deployment.
The dev.primary.tfvars has the following code:
is_primary_deployment = trueUsing Terraform to deploy our primary region infrastructure
We can deploy our infrastructure using the command terraform apply -var-file="./variables/dev.tfvars" -var-file="./variables/dev.primary.tfvars". This will deploy all our infrastructure into the primary region and once it completes you should see the resource group and configured resources in Azure, similar to this:
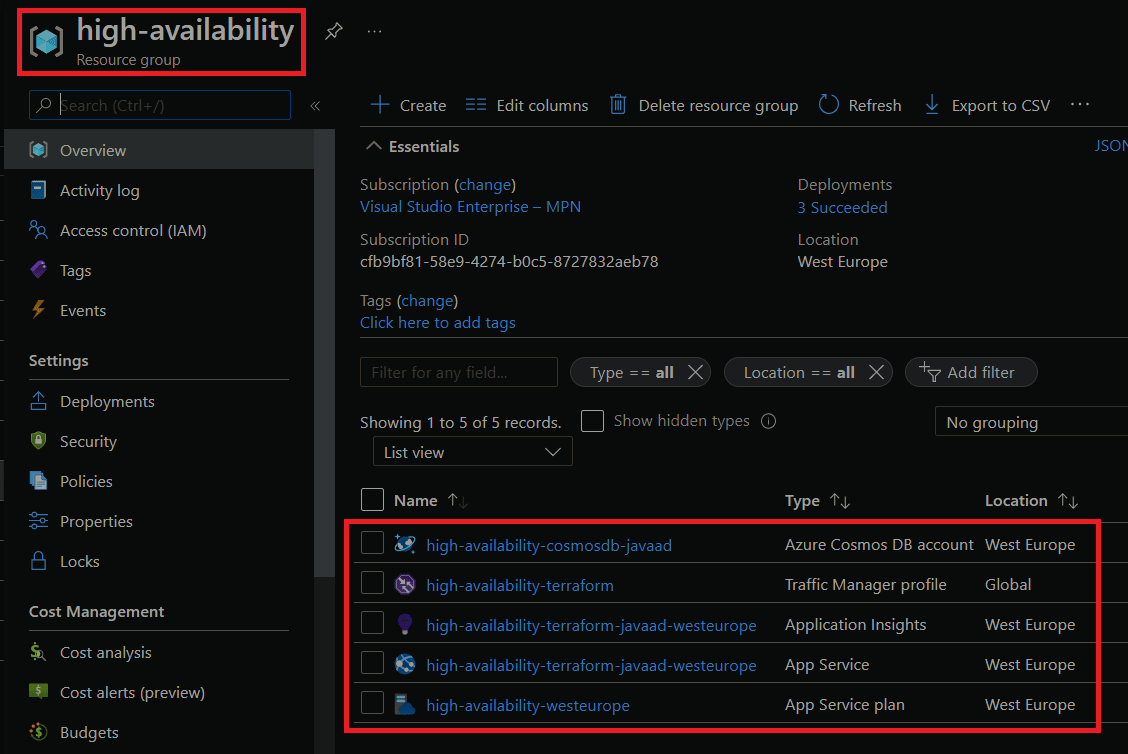
If we go to the Azure Traffic Manager profile, we'll see that our primary endpoint is set up. If we navigate to the DNS name for our Traffic Manager we'll see that it takes us to the deployed Azure App Service.
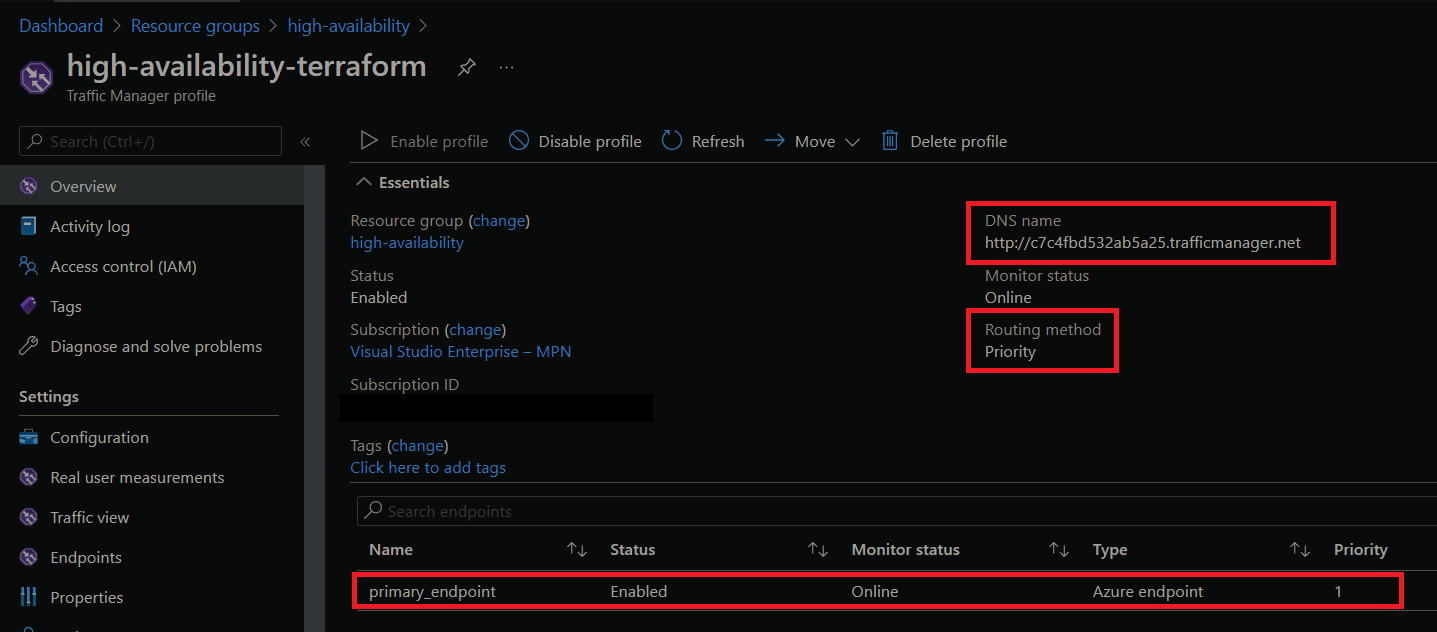
If we do an nslookup using our Azure Traffic Manager DNS name, we'll see that it is routing to our primary Azure App Service.
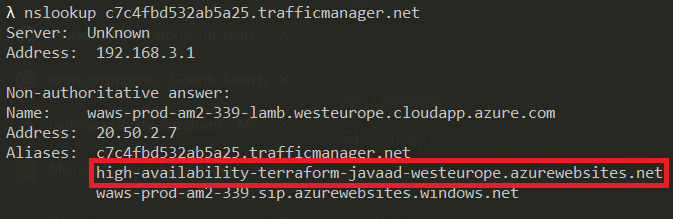
That's it, we have all our Azure resources deployed into our primary region with traffic being routed correctly.
Now that we have our primary region setup, lets test how we can handle a regional failure with our Terraform configuration. That's where the true power of this configuration comes to life.
Using Terraform to handle regional failure
To simulate a regional failure we'll turn off the Azure App Service in our primary region. Once we do, we'll see that the monitor status for our primary endpoint in Azure Traffic Manager is stopped and no traffic will go to our primary region.
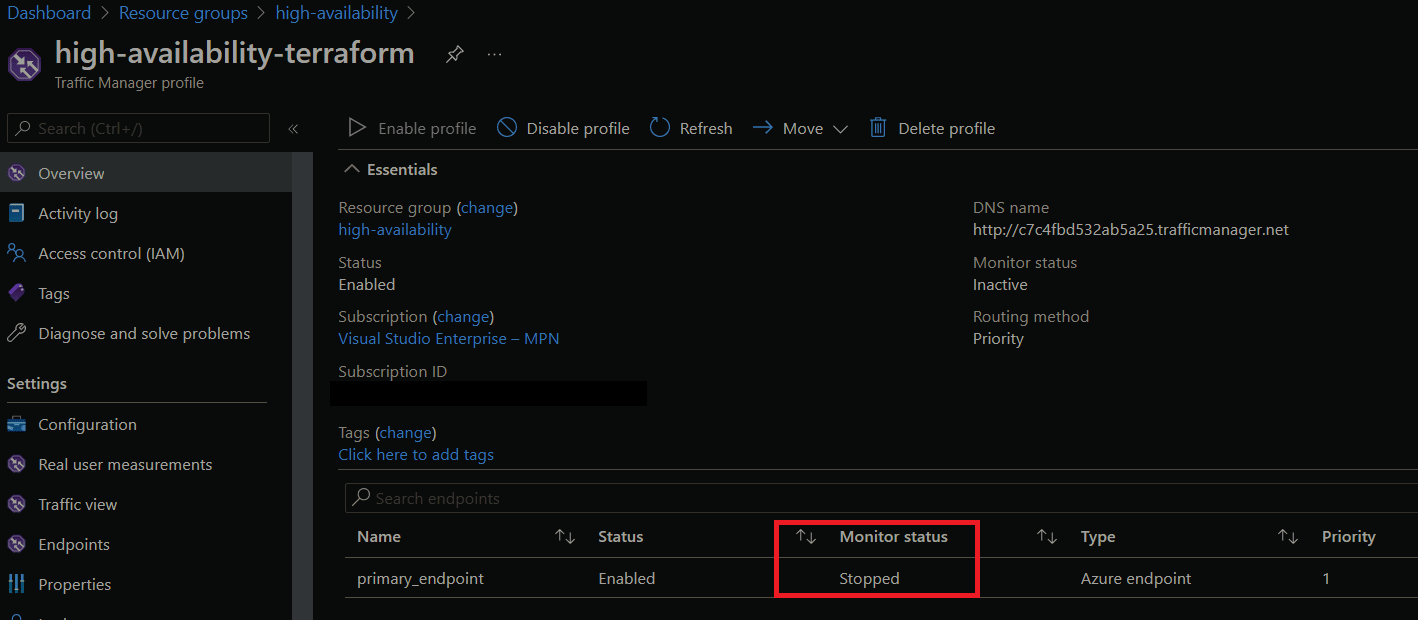
If we do an nslookup, this time see that we can't route to our App Service.

Of course, in a real-world scenario, you're not going to know when your primary endpoint goes down like this. Well, hopefully you'll know before angry customers start calling you. For a true production system, you'd have alerts configured to notify you that your endpoint has degraded or you can query the Traffic Manager Rest API directly to detect an endpoint degradation.
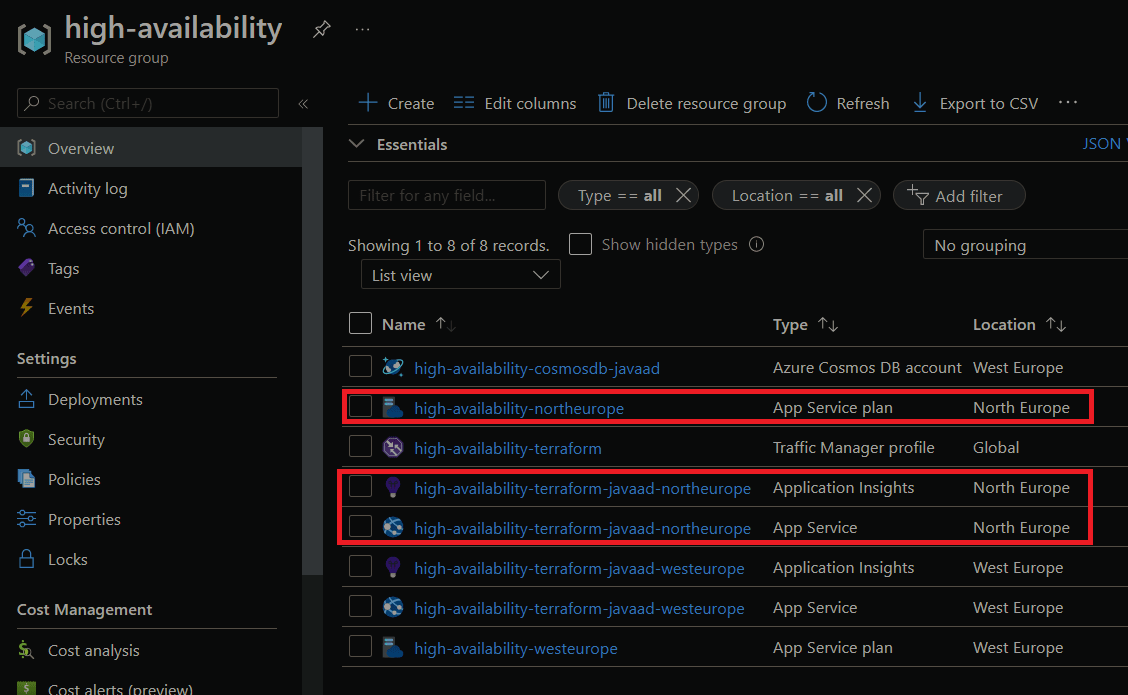
Now we've detected that our primary region has failed, and we need to deploy our infrastructure to our secondary region. We can do this by simply running the command terraform apply -var-file="./variables/dev.tfvars" -var-file="./variables/dev.secondary.tfvars". Once we do, all the required resources should be deployed into our resource group:
We can confirm that traffic is going to our secondary region by doing an nslookup against the traffic manager endpoint:
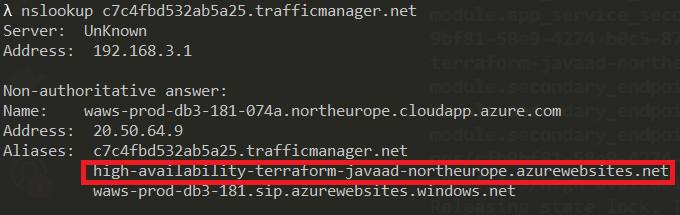
Isn't that awesome? With a single command, we've successfully failed over to our secondary region. All our traffic will be directed to our secondary region and our data in Cosmos Db would have been replicated to this region so we would have only lost a minimal amount of data.
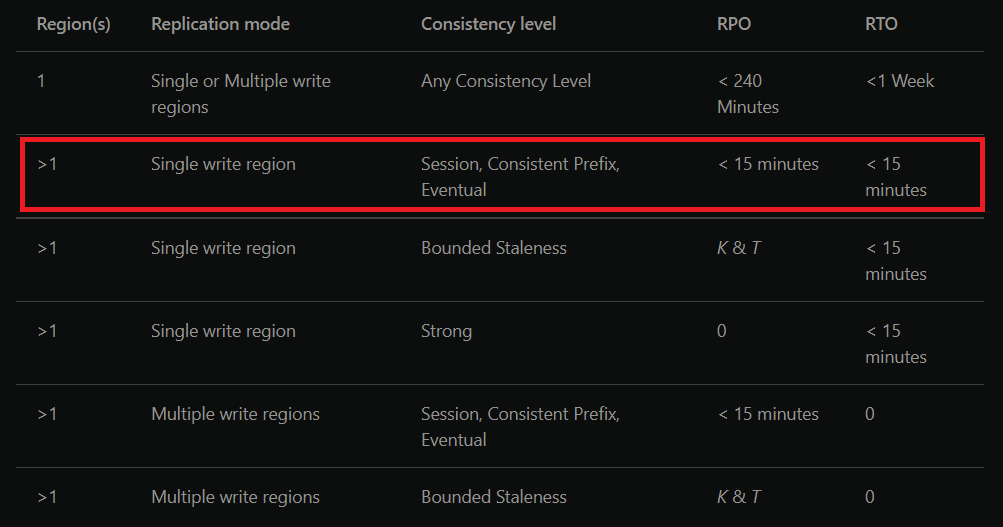
From the guidelines Microsoft provides around RPO and RTO for Cosmos Db, we can see that with our Cosmos Db configured for a single write region and eventual consistency, we'd have an RPO and RTO of less than 15 minutes. Our infrastructure deployment takes less than 10 minutes and if we assume we can deploy our code in under 5 minutes that makes our total system RPO and RTO 15 minutes, which is amazing.
We've just successfully failed over to our secondary region. Once our primary region recovers, traffic will be automatically redirected to it. At this point, we can then destroy the resources in our secondary region using the command terraform destroy -target=module.app_service_secondary -target=module.secondary_endpoint -var-file="./variables/dev.tfvars" -var-file="./variables/dev.secondary.tfvars". This would clean up all our secondary region resources so that we don't end up paying for resources we no longer needed.
Wrapping up: Azure availability concepts and terrific Terraform
To summarize, in the first post we defined what is meant by availability and why its important. We then went through the basic concepts of availability in Azure, from the idea of fault domains being the most atomic unit, to Azure regions at the highest level. We then discussed different architecture setups for achieving high availability like Active/Passive with cold standby and how we could achieve this using infrastructure as code. We then dived deep with a hands on tutorial on how to create a high availability architecture using Terraform.
This article has been one of the longest and most researched for me, so I hope you've found it useful and that it has taught you more about availability and how to achieve it using Terraform.